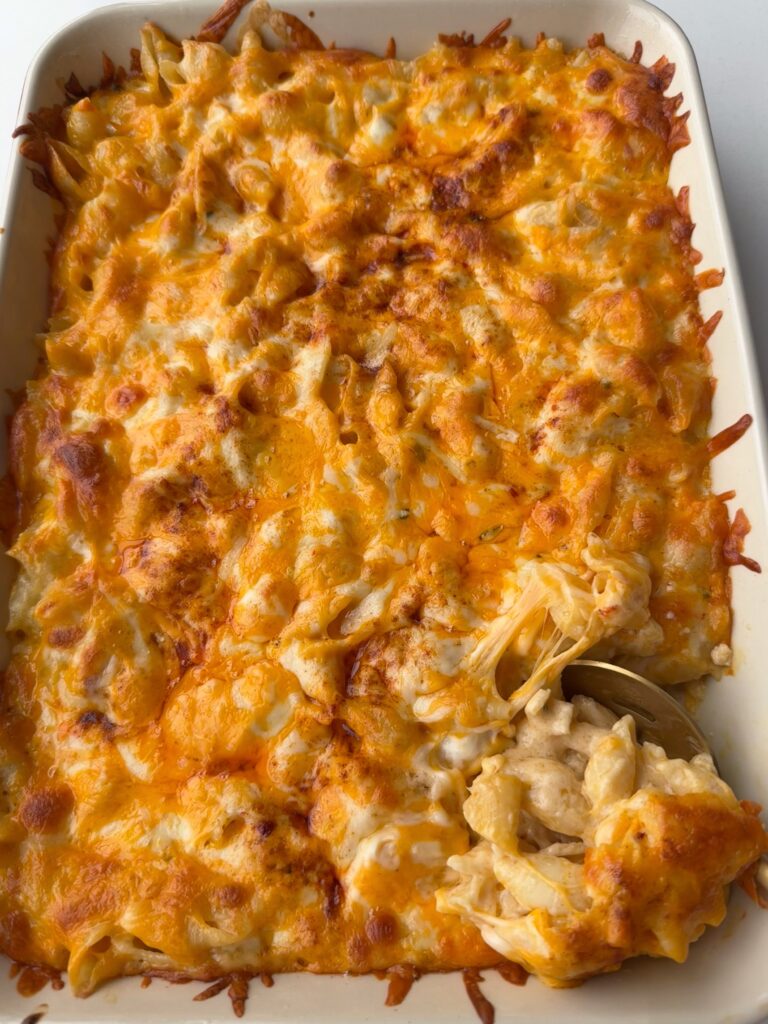
If there is one recipe on Rockin Meals that has earned its place on your Thanksgiving tables, it’s this one. I’ve been making this mac and cheese for YEARS, and along the way, so many of you started making it for your own Thanksgivings and family gatherings too. Truly nothing makes me happier than hearing that Hella Good Mac has become part of your holiday traditions too!
Growing up, I was pretty obsessed with all things Food Network and cooking shows. Between watching Rachael Ray’s 30 Minute Meals, Ina Garten, and copious episodes of Chopped, cooking shows were pretty much all I wanted to watch. One Thanksgiving when I was about 10 years old, I decided I wanted mac n cheese for Thanksgiving dinner. And not just that year mind you… I wanted it to become a staple at our Thanksgiving table.
So my mom told me what every demanding child with a food request should hear: if you want mac n cheese, you better learn how to make it yourself.
So I did. And I made A LOT of them.
Over the years, I probably tried a million recipes before figuring out my own style and preferences. I learned from recipes like I Heart Recipes’ Soul Food Mac, Lazarus Lynch’s Mac Attack, and Patti LaBelle’s Over the Rainbow Mac and Cheese before eventually creating my own version… my masterpiece, shall I say. Which really just equates to my perfect mac n cheese with all the things I love most: an ultra-creamy cheese sauce with multiple types of cheeses, tons of flavor, and that gooey, cheesy pull when you scoop into it.
And anyone who knows me knows I take mac n cheese VERY seriously. It’s not a task that just gets passed on to anyone. Like, you don’t just sign up to bring the mac n cheese to Thanksgiving without people knowing you can throw down, you know?!
But I will confidently say that with this recipe, you can.
It has stood the test of my own family Thanksgivings, Thanksgivings with other families (including my chef in-laws!!), and countless Friendsgivings where I’m literally not allowed to show up without it.
So this is where I let the recipe do the rest of the talking if you need any more convincing. Because this mac is just that good. It’s rich, decadent, unapologetically cheesy, with the perfect blend of flavorful and melty cheeses. Exactly what I want next to my turkey on Thanksgiving, or really any other special occasion.
Why You’ll Love This Recipe
- Ultra creamy AND cheesy. You get a creamy cheese sauce throughout the pasta plus layers of shredded cheese for those ooey-gooey cheese pulls and slightly crisp crust when you scoop into it.
- It’s tried-and-true. I’ve been making this recipe for years, and so many Rockin Meals readers now make it for their own Thanksgiving and holiday gatherings year after year.
- It’s made for the holidays. You can make and assemble it fully ahead of time and bake it while your turkey rests, making Thanksgiving timing much easier.
- Cheeses variety means maximum flavor and cheese pull. Gouda, Monterey jack, sharp cheddar, pepper jack, AND cream cheese each bring something different to the sauce.
- It feeds a crowd. One 9×13 pan makes a generous side dish for family dinners, BBQs, Friendsgiving, Thanksgiving, Christmas, or any gathering where mac and cheese is non-negotiable.
Ingredients
- Pasta: I prefer medium shells or medium-large elbow macaroni. Avoid very small elbows, which can overcook more easily while the mac bakes.
- Evaporated milk + half & half: The combination creates a rich, creamy sauce without making it overly heavy.
- Double cream gouda: Use a young, creamy gouda rather than an aged gouda so it melts smoothly into the sauce. This is one of the most important cheese selections because it adds flavor and creaminess.
- Monterey jack: A mild, creamy cheese that melts beautifully.
- Sharp cheddar: Gives the mac that classic cheddar flavor and a little more bite.
- Pepper jack: Adds another layer of creaminess and just a hint of flavor. It doesn’t make the finished mac spicy! You can substitute Colby or additional Monterey jack or even mozzarella if preferred.
- Cream cheese: Helps make the sauce extra creamy and luscious.
- Butter + flour: These create the roux, which thickens the cheese sauce.
- Seasonings: Lawry’s seasoned salt, garlic powder, paprika, mustard, and black pepper keep the sauce flavorful enough to stand up to all that dairy. As I always say, we ABS (always be seasoning) around here.
Tips & Tricks
- SHRED YOUR OWN CHEESE. If you take one tip from this entire post, let it be this one! Buy blocks of cheese and grate them yourself. Pre-shredded cheese contains anti-caking ingredients that can prevent it from melting as smoothly. Yes, shredding four blocks of cheese is annoying. I promise it’s worth it.
- Keep the heat LOW when making your cheese sauce. This is probably the second most important part of the recipe, especially if you’ve never made a roux-based cheese sauce before. After cooking the butter and flour together, slowly whisk in your evaporated milk and half & half. Your pan should NOT be screaming hot. If the milk aggressively sizzles the second it hits the pan, your heat is too high.
- Keep whisking. When adding the milk to the roux, pour it in gradually while continuously whisking. Don’t dump all of the liquid in at once. Adding it slowly helps you create a smooth sauce without lumps. Your roux won’t be thick yet until you finish adding all the cheeses.
- Room-temperature dairy helps. Let your half & half come closer to room temperature before adding it to the roux. Very cold dairy hitting a hot roux can make it harder to get that silky-smooth consistency.
- Turn the heat to low before adding the cheese. I am trying to avoid sounding repetitive, but high heat is the enemy of a smooth cheese sauce. Once you’re ready to add the cheese, keep the burner LOW.
- Add your cheese a little at a time. Don’t throw all your shredded cheese into the pot at once. Add a handful, stir until melted, then add the next handful. Keep going until you have a smooth, glossy sauce.
- Don’t overcook your pasta. Cook it 1–2 minutes LESS than the package directions. It should still have a little bite when you drain it because it will continue cooking in the oven. Overcooked pasta usually results in mushy mac and cheese.
- Don’t overbake it either. Everything is already cooked when the mac goes into the oven. You’re really just melting those layers together and getting everything hot and bubbly. Baking too long can dry it out, so you want to make just until the cheese on top has melted, then finish under the broiler for that signature bubbly cheese crust.
- Use the cheeses listed when possible. You can absolutely make swaps, but think about what each cheese is doing. Swap a creamy melting cheese for another creamy melting cheese (Monterey jack for Colby, for example) rather than replacing it with a hard or aged cheese that melts differently.
- For a golden top: Broil the mac for just 1–2 minutes at the end. DO NOT walk away from the oven! Cheese can go from beautifully golden to burnt very quickly.
Making It Ahead
This mac and cheese is best freshly made and baked, but it is really easy to make it almost fully ahead.
For the best result, assemble the mac and cheese through the layering step, cover tightly, and refrigerate it unbaked overnight. The next day, take it out of the refrigerator while your oven preheats so the casserole can lose some of its chill before baking.
My favorite Thanksgiving strategy is to assemble the mac earlier in the day or the day before, then pop it into the oven as soon as the turkey comes out. The mac can bake while the turkey rests and gets carved, so everything hits the table hot.
If you’re prepping it the day before, be especially careful not to overcook your pasta, and let it cool fully before placing it in the fridge. Keep it firmly al dente since it will be sitting in the sauce overnight and then baking the next day.
Serving Suggestions
Obviously, my number one answer is Thanksgiving dinner. This mac and cheese belongs next to turkey, stuffing, mashed potatoes, green beans, collard greens, sweet potatoes (give me ALL the sides).
My second favorite, is with some BBQ ribs, collard greens, and cornbread for a BBQ potluck, but it’s perfect for really any event you are having people get together over food.
More Thanksgiving Sides Recipes
If Hella Good Mac is making an appearance at your holiday table, round it out with some of my other favorite comforting sides and holiday recipes:
- Herb Sausage Stuffing
- Mama Hazlett’s Easy Cornbread
- Boursin Creamed Spinach
- Garlic Confit Mashed Potatoes
Hella Good Mac n Cheese
- Total Time: 45
- Yield: 6-8
Description
The ultimate baked mac and cheese recipe with an ultra-creamy homemade cheese sauce, gooey cheese pulls, and tons of flavor—perfect for Thanksgiving, holidays, and family gatherings.
Ingredients
For the Best Macaroni and Cheese:
- 1 lb medium shells or elbow macaroni (medium-large preferred, the small ones tend to overcook)
-
1 12oz can evaporated milk
-
1½ cups half & half
-
8 oz block double cream gouda (not aged) – about 2 cups, shredded
-
8 oz block Monterey jack cheese, shredded
-
8 oz block sharp cheddar, shredded (yellow cheddar like Wisconsin)
-
4 oz block pepper jack (about 1 cup), shredded (or substitute for Colby or Monterey jack)
-
4 oz room temperature cream cheese, cut into cubes
-
3 tbsps unsalted butter
-
3 tbsps all purpose flour
-
1 tsp Lawry’s seasoned salt
-
½ tsp garlic powder
-
½ tsp paprika + more for topping
-
1/4 tsp ground mustard (or 1 tsp Dijon mustard)
-
½ tsp black pepper
Instructions
For the Best Mac n Cheese:
-
Shred all your cheeses. Reserve half for the cheese sauce and half for topping.
-
Preheat oven to 350°F. Get a large pot full of salted water to boiling.
-
Now, work on your cheese sauce. In a large high sided skillet or pot, add in the butter on medium heat. Once melted, whisk in the flour to create a roux (it will start to form a paste).
-
Cook the flour for 30 seconds to 1 minute until well combined and you don’t see any raw flour or clumps.
-
Slowly pour in the evaporated milk, whisking frequently for 2-3 minutes until well incorporated. Continue by whisking in the half & half a little at a time. It won’t be very thick at this time, but it will thicken up as you add the cheeses.
-
Add the seasoned salt, black pepper, garlic powder, paprika, and Dijon mustard or ground mustard and stir to mix in. Taste and adjust for seasoning.
-
Add in the cubed cream cheese and half the shredded cheese, a little at a time. Stir on low until the cheese has melted.
-
While the cheese is melting, add pasta to the pot of boiling water, stir, and cook 1-2 minutes less than the package instructions until al dente. It should still have a bit of a bite, as it will finish cooking in the oven.
-
Once the pasta is cooked, drain and rinse briefly with cold water to stop the cooking process.
-
Add the pasta to the cheese sauce, stirring until well combined.
-
Add a layer of the pasta to a 9×13 casserole and a layer of the reserved shredded cheese. Top with the remaining mac n cheese mixture and the remaining shredded cheese. Sprinkle a bit of paprika over top for color.
-
Bake uncovered for 24-26 minutes until cheese is melted and bubbly. For an extra golden brown top, broil for the last 1-2 minutes if desired, keeping a close eye on it. Serve immediately and enjoy!
- Prep Time: 15
- Cook Time: 30
- Category: Side Dish
Storage
Store leftover mac and cheese in an airtight container in the refrigerator for up to 3–4 days.
For the best texture when reheating, add a tiny splash of milk or half & half before warming to help loosen the sauce back up. Individual portions can be reheated in the microwave, or you can cover a larger portion with foil and warm it in the oven until heated through.
Keep in mind that mac and cheese will naturally thicken as it sits in the refrigerator, so leftovers won’t be quite as creamy as they are straight from the oven.
FAQs
Can I make this mac and cheese ahead of time?
Yes! Assemble the entire dish without baking, cover tightly, and refrigerate overnight. Let it sit out while the oven preheats the next day, then bake.
Why did my cheese sauce turn grainy?
The most common culprit is too much heat. Cheese doesn’t love extremely high temperatures. Keep your burner low when adding the cheese and add it gradually, stirring between additions. Freshly shredded cheese will also give you a smoother sauce than pre-shredded cheese.
How do I know if my pan is too hot when making the roux?
When you begin adding the dairy, it shouldn’t violently sizzle as soon as it hits the pan. If it does, lower your heat. Add the liquid gradually while whisking constantly.
Can I use pre-shredded cheese?
Technically, yes, but I really don’t recommend it for this recipe. Freshly shredded cheese melts much more smoothly and gives you that creamy, glossy sauce we’re looking for.
Can I substitute the cheeses?
Yes, within reason! Try to replace cheeses with ones that have similar melting properties. For example, Colby or mozzarella is a great substitute for Monterey jack or pepper jack. Avoid swapping too many of the creamy cheeses for aged or hard cheeses, which can change the texture of the sauce.
Is the pepper jack spicy?
Not really! With all of the other cheese and dairy in the recipe, it adds flavor rather than noticeable heat. If you’re sensitive to spice or just don’t want to use it, substitute Colby or additional Monterey jack.
Why do I undercook the pasta?
Because the pasta cooks again in the oven. Boiling it 1–2 minutes shy of the package directions helps it stay al dente instead of becoming soft or mushy after baking.
Can I double this recipe for a large Thanksgiving?
Absolutely. I recommend dividing a double batch between two 9×13-inch baking dishes rather than trying to cram everything into one extra-deep pan. They’ll bake more evenly and they’re much easier to serve.
Can I bake the mac and cheese before Thanksgiving and reheat it?
You can, but I don’t recommend it if you have another option. Mac and cheese is at its creamiest immediately after baking. For Thanksgiving prep, assemble it ahead and refrigerate it unbaked, then bake shortly before serving instead.


Mmmmm…cheesy perfection
No cheese is too much cheese 😉
I’ve been making this Mac & Cheese for the past 4 years for friends and family on Thanksgiving. Literally always hits, always the first side dish without leftovers. Do not skimp on the quality of the cheese – splurge a little bit if you can because the ratios are superb.
YAY! This makes me so happy, SO glad you love it too – 100% agree on the no leftovers!
Absolutely amazing!
A true star!
Amazing!! Love this recipe. So happy to have Hazlette recipes in my file..Thank you!
Yay! So glad you enjoyed it Sara, it’s a favorite for us too!