Cooking chicken breast is one of those deceptively simple skills that can completely change the way you cook at home. It’s the weeknight protein hero: versatile, healthy, and quick, but it’s also the thing most people dread making because of how often it turns out dry or bland. To be honest, I too used to avoid chicken breast for fear of undercooking or overcooking the chicken – I could cook a paella and creme brûlée and all these more complex dishes, but I hadn’t mastered the art of getting the “simple” things right. It took me a bit to land on a method I felt was truly foolproof, but as soon as I did I haven’t looked back since. My hope is to highlight more recipes that bring things back to the basics, because if you can make juicy, flavorful chicken breast on repeat, you’ve got a skill that will carry you through endless meals.
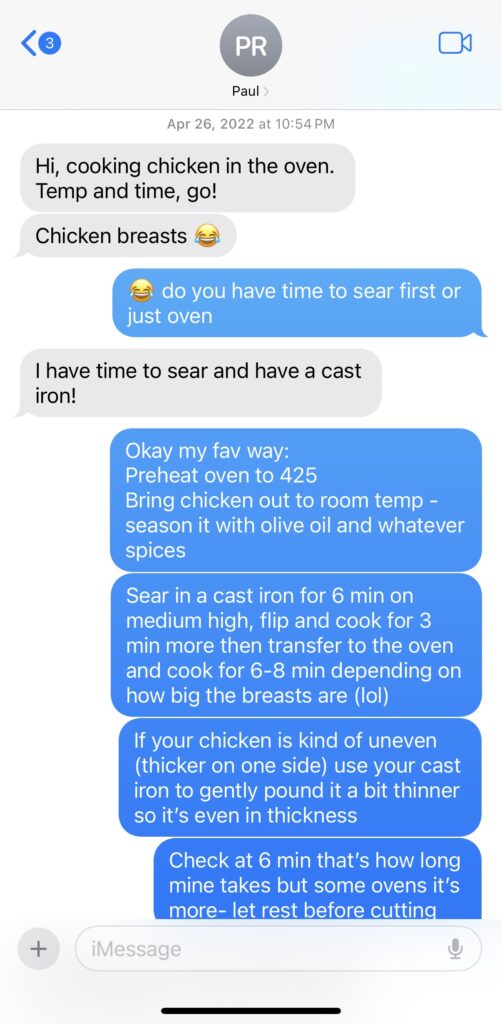
Chicken breast has a bad reputation for being dry, which is fair because it’s so easy to overcook. The line between underdone and overdone is super thin, which often makes us err on the side of safety and cook it too long (hello, stringy chewy chicken yikes). Over time, I’ve refined this method into a recipe that delivers juicy, reliable results every single time. And it’s not just me—back in 2022, a friend texted me asking how to finally master chicken breast, and I sent him this exact method. He crushed it, and it’s been his go-to ever since. I saved that screenshot to show how long this recipe has been in the rotation—and how it really does work, every single time.
Essential tools
- Meat thermometer (non-negotiable): This is the tool that makes all the difference. Every chicken breast cooks a little differently depending on its size, thickness, and your cooking method. A thermometer means you can take the guesswork out of knowing when your chicken is done or not.
- For an affordable I option that gets the job done, I like this one from ThermoPro or this one from Lavatools.
- I also have the Meater, which can also be used with chicken breast but is great for roast chicken or turkey and longer cooks, as it connects to your phone and alerts you when your protein is at the temperature you set it to. While pricier, it is a fantastic gift I’ve gotten for pretty much everyone in my family LOL.
- Oven-proof skillet (helpful, not mandatory): Cast iron or stainless steel work great. This lets you start the chicken on the stove for a golden crust and finish it in the oven without switching pans. If you don’t have one, just transfer to a sheet pan (it may take a minute longer since the pan isn’t preheated).
The tricks to great chicken breast
- Use a thermometer. (Worth repeating.) Pulling the chicken at the right temperature = juicy chicken every single time.
- Don’t be shy with salt. Salt seasons the meat all the way through and helps with moisture retention. I salt first, then layer on other spices (garlic powder, onion powder, smoked paprika, oregano, etc.).
- Even out the thickness. Chicken breast usually has a thick end and a thin end. A few gentle pounds with a skillet or mallet makes it cook evenly (don’t go crazy though, it’s not a cutlet).
- Whether you wash your chicken or don’t, it’s not really my business, but I personally prefer to just pat my chicken dry with paper towels so I avoid getting bacteria in my sink from washing.
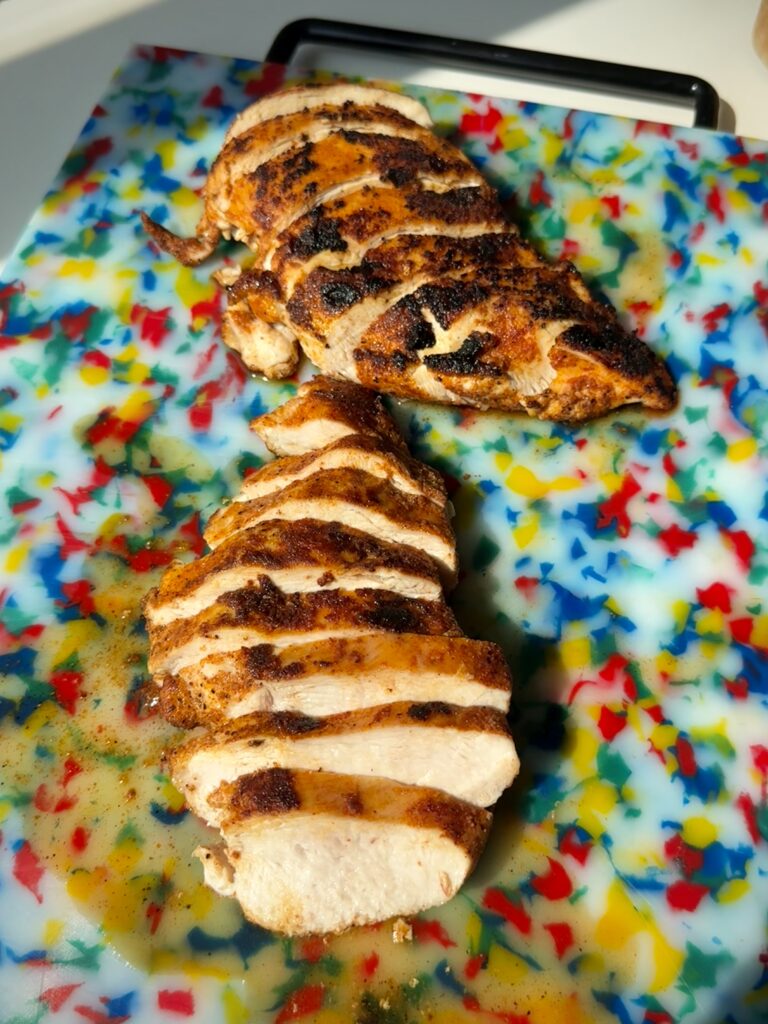
- My 6-3-6 method.* Sear 6 minutes on one side, flip for 3 minutes, then finish in a 425°F oven for 6–8 minutes, until the thickest part reads 155°F. Rest for 5-10 minutes before slicing.
What temperature should I cook chicken breast to?
Most of us have been taught the “165°F rule” for safe chicken. While it’s true that chicken is instantly safe at 165°F, food safety actually depends on both time and temperature. In other words: chicken can be perfectly safe (and juicier!) at slightly lower temperatures if it rests long enough because I promise you if you’re cooking your chicken 165°F it will most likely result in dry chicken!
Food writer and chef J. Kenji López-Alt (my fav) explains this beautifully in his guide to sous vide chicken breast. After digging into his research (and testing it in my own kitchen), I’ve found the sweet spot is pulling chicken at 155°F and letting it rest for 5 minutes. At 155°F, resting at around 3 minutes makes it safe to eat, and the difference in juiciness compared to cooking all the way to 165°F is night and day.
Print
Perfect Chicken Breast
- Total Time: 20
- Yield: 2
Description
A foolproof and easy way to cook juicy, flavorful chicken breast every single time.
Ingredients
For the Perfect Chicken Breast:
- 2 chicken breasts
- 2 tbsps preferred seasoning (I like garlic powder, onion powder, black pepper and smoked paprika)
- Salt to taste
- 1 tbsp avocado oil
Instructions
For the Perfect Chicken Breast:
- Preheat the oven to 425°F. Take the chicken out of the fridge while the oven heats so it can come closer to room temperature.
- Pat the chicken dry with paper towels. If the breast is much thicker on one end, cover with plastic wrap and gently pound with a heavy skillet or mallet until the thickness is more even.
- Season generously all over with salt, then sprinkle on your preferred seasoning blend. Make sure to coat both sides evenly.
- Heat a cast iron (or oven-proof) skillet over medium heat. Once hot, drizzle in avocado oil and swirl to coat. Add the chicken.
- Cook for 6 minutes on one side, then flip and cook for 3 minutes. Transfer the skillet to the oven and roast for 6–8 minutes, or until the internal temperature reads 155°F.* For best results, position the thicker side of the breast toward the back of the oven, where it tends to be hottest.
- Transfer chicken to a cutting board and let it rest for 5 minutes before slicing. Serve and enjoy!
Notes
*Chicken will continue to rise in temperature as it rests, ending up perfectly juicy and safe to eat.
- Prep Time: 5
- Cook Time: 15
- Category: Dinner
- Method: Oven Roasted