Growing up, my grandpa was always on turkey duty. My grandma and I would be on sides and pies, and his main purpose was all things turkey. I’ve seen him try every method under the sun – wet brine, dry brine, compound butter, you name it. About 8 years ago I decided to finally bite the bullet and make turkey myself for Friendsgiving, and if you know me, you know that means I read no less than 80 turkey recipes, scoured the Internet for all tips and tricks from top chefs and publishing sites, and read just about every reddit thread you can imagine. I wanted to pair that knowledge with the trial and error of watching my grandpa take this on for years to have the moistest, most delicious turkey ever.
I didn’t want to mess this up, and me being as extra as I am, I decided on a trifecta for the turkey: Ciao Samin’s Buttermilk Brine, Martha Stewart’s Cheesecloth method, and Kenji Lopez’s Compound Butter. Was it flavorful? Absolutely. But was it also a massive pain in the bum to do allll of those steps? Also yes.
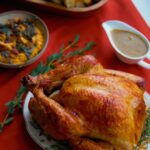
Over the years, I have refined the way I make my turkeys to have something a little bit more streamlined, but that still tastes like I put all the effort in of years past. The result is a truly foolproof turkey recipe, one that comes out beautifully golden brown and juicy on the inside every. single. time. I have included all my tips on having a delicious and moist turkey below, but the main game changers are as follows:
- Dry Brine – brining your turkey with salt and baking powder (a trick from J. Kenji López-Alt) 24-48 hours in advance makes a perfectly seasoned bird with a gorgeous golden brown skin. It is also infinitely easier than a wet brine – no massive pot or brining bag needed, no more buying 5 gallons of buttermilk.
- Cheesecloth – Martha Stewart, there’s a reason why your name is known in every household. Her cheesecloth method has absolutely never steered me wrong, and its resulted in a perfect turkey every time (even my first turkey 8 years ago where I truly didn’t know what I was doing).
- Meat Thermometer – a few years ago, my friend got me a Meater for my birthday and it is truly one of the best gifts I have ever gotten. I have bought one as a gift for almost every member of my family, and we have not had a dry turkey since. It takes the guesswork out of cooking a turkey and makes your day SO much less stressful, I can’t recommend it enough. The meater goes inside the turkey before you cook it, so you’re not constantly having to open the oven and check temp, and it connects to your phone, giving you estimated time alerts of when the turkey is going to finish cooking. This is crucial for the cheesecloth method, because in order to get a beautiful golden brown, you need to remove the cheesecloth an hour before it finishes cooking.
All of these methods, plus a few tricks of my own I’ve learned throughout the years result in not only the best turkey I’ve ever had, but the best turkey my friend’s have ever had too (this was a hit at our Friendsgiving!) If you follow these tips below, I promise you’ll have a delicious and foolproof turkey recipe to keep in your back pocket for years to come.
Before you start, take inventory of your home to make sure you have everything you actually need to bake a turkey: roasting tray, meat thermometer, cheesecloth, twine, baster, etc. I linked everything you may need below:
Roasting Tray – you want a roasting tray that has a V Rack within it to help circulate air underneath the turkey.
Cheesecloth – this is what makes this recipe so foolproof and the turkey so juicy.
Meat Thermometer – a non negotiable for me, as I absolutely do not recommend relying on time vs temperature when roasting a turkey. Pulling a turkey at the right temperature results in a juicy bird.
Twine to tie up the legs (if your turkey doesn’t already come tied)
Baster – this is crucial for keeping the turkey and cheesecloth moist throughout the cooking process.
Turkey Tips:
-
Buy your turkey 5-7 days in advance as it always takes longer to defrost the turkey than you think. Fresh turkeys are really hard to come by and often have to be reserved in advance. I bought my 15 pound turkey frozen and it took about 5-6 days in the fridge to fully thaw. Keep in mind, you want your turkey fully defrosted by Wednesday morning, so you can dry brine the turkey properly before cooking.
- Dry Brine – this is essentially a dry marinade for your turkey.
- When salting a protein well in advance, you allow the flavor to penetrate beneath the skin of the protein, allowing it to get flavored all the way through.
- Adding a bit of baking powder to your brine also results in a beautifully golden brown turkey skin. I use a ¼ cup salt to 1 tbsp baking powder ratio for a 15lb turkey. If you have a smaller turkey, you may not need to use all of it. You need about 1 tbsp of salt for every 4 lbs of turkey. I use Diamond Crystal Salt for this recipe and really all my recipes. If you are using Morton’s kosher salt, start with half the amount of salt as it is much saltier.
- You want to salt your turkey 24-48 hours in advance of cooking, and leave in the fridge uncovered to dry out the skin. This is what makes the skin crispy! If you are dry brining for over 24 hours, loosely cover the turkey with cheesecloth or plastic wrap to prevent excess moisture loss.
-
Remove your turkey from the fridge 2 hours before cooking to allow it to properly come to room temperature. Cooking a turkey straight from the fridge can result in uneven cooking, or the outside cooking faster than the inside, which is not what we want!
- Butter soaked cheesecloth – ever since I started following the Martha Stewart trick of cooking a turkey with butter soaked cheesecloth I have not looked back. The cheesecloth protects the skin and keeps it from browning faster than the inside of the turkey cooks, but still has better air circulation than foil, allowing heat to penetrate the turkey. It keeps the turkey moist throughout the cooking process, adding flavor and improving the cook. A few tips to keep in mind:
- Soaking the cheesecloth in butter, white wine, and aromatics like herbs and garlic add flavor and moisture. You want the cheesecloth to be fully saturated in the cooled butter and wine mixture before adding to the turkey. You also want to keep the cheesecloth moist throughout the process, which is achieved by basting the turkey every 30 minutes.
- Peeling the cheesecloth off can be the trickiest part of this, as the turkey skin gets delicate as it cooks. The best way to do this is slow and steady, basting the cheesecloth with the turkey juices from the pan to ensure the cheesecloth is wet as you peel it off. You want to do this an hour before the turkey has finished roasting to allow the turkey to get golden brown. Do this process with the turkey removed from the oven to avoid too much heat escaping the oven.
- Your first baste will be with the remaining wine/butter mixture, then the rest will be using the juices from the bottom of the pan. If you notice your pan getting too dry, add more broth.
- The biggest game changer and stress reliever when cooking turkey is using a digital meat thermometer, especially one that remains inside the turkey as it cooks, like my Meater Thermometer. It connects to my phone and monitors everything from internal temperature to ambient temperature (oven temperature) to estimated cooking finish time. This is extremely helpful with the cheesecloth method, as I pull the cheesecloth off when the Meater tells me I’m 1 hour out from cook time. Place the meater in the thickest part of the thigh (where the thigh meets the body), avoiding the bone, prior to cooking.
- You do not want to cook a turkey to time, you want to cook a turkey to temperature. The ideal temperature to cook your turkey to is 165°F. Cooking the turkey to temperature is the most foolproof way to bake a turkey that not only reaches safe temperature to eat, but is also still juicy and moist.
- Stuffing the cavity with aromatics like lemon, onion, herbs, and garlic help add flavor from within the turkey, not just from the outside. You also want to make sure the cavity is full, so no hot air enters and dries out the turkey.
- Adding chicken or turkey broth to the base of the roasting pan ensures you’ll have enough drippings to baste the turkey with, and also creates a little steam to keep the turkey moist. I like to start with 2 cups and add more as needed throughout the cooking process.
- Start the turkey high for the first 30 minutes (450°F), then cook the rest of the turkey at 350°F. This helps the skin get a head start, whereas the lower cooking temperature ensures the turkey cooks properly all over.
- When adding the turkey to the oven, you want the legs to be facing the back, as those take the longest to cook and the back of the oven is the hottest part of the oven. Once you pull of the cheesecloth, you can rotate this around to get the breast skin properly golden brown.
Let’s Talk Gravy
Some argue gravy is the glue to a Thanksgiving table and I don’t disagree! It brings so many of the dishes together and it can really revive leftovers. Choosing what method to make your gravy with is highly personal – my grandma (and I) like making our gravy ahead of time so it’s one less thing to worry about on the day of. HOWEVER, making gravy ahead of time can be a labor of love since you have to roast the bones, simmer the broth, etc. so I wanted to offer another option as well. You can absolutely make gravy day of (most people do!) following some tips below. I have listed out both recipes so you can choose what you like!
Day Of Gravy Recipe:
After roasting your turkey, you should have some drippings in the bottom of your roasting tray. The amount will depend on a variety of factors, and is one of the reasons I like to have extra broth on hand to add to the pan during the turkey cooking process to ensure I have enough drippings.
- Once the turkey is out of the oven and roasting on a cutting board, pour pan drippings (what’s left in the pan after cooking the turkey) into a large glass measuring cup or bowl. Let the drippings sit for a few minutes until you start to see the fat rise to the top. Use a ladle or spoon to skim off most of the fat from the drippings.
- To make the gravy, add 1 cup of the drippings into a large saucepan over medium heat. Whisk in 1/2 cup all purpose flour until you have a smooth paste, then continue cooking for a few minutes until darkened in color to cook out any raw flour taste.
- Slowly pour any remaining turkey drippings from the pan, as well as up to 4 cups of chicken broth. The amount of chicken broth you use will depend on how many drippings you have left, so start with 3 cups and add more as needed to reach desired thickness. You want about 4-5 cups total liquid for the gravy (not included the first cup used to make the roux).
- Cook the gravy for 7-8 minutes, stirring often until thickened to your liking, adding more broth if needed. Season to taste with salt, pepper, and any dried herbs like sage or thyme if desired and serve warm.
Make Ahead Gravy Recipe:
I love starting my gravy a few days ahead of time to take one thing off my plate on the big day. All it takes is just roasting turkey wings with veggies and aromatics, then creating a fortified stock that will be the base of the gravy. Refrigerating the stock overnight allows you to easily skim the fat, which you can whisk with flour for the base of your gravy or discard and use a standard butter and flour roux (it all depends on your flavor preference!). I like to make the gravy a little extra thick ahead of time, since it will loosen up when you whisk into the pan drippings. This is of course completely optional, but here’s what I like to do:
Ingredients:
- 4 lbs turkey wings, necks, thighs
- 3 celery stalks, washed and cut into 3” chunks
- 2 large carrots, washed and cut into 3” chunks
- 1 leek, sliced in half lengthwise and washed
- 3 large shallots
- 1 whole head of garlic
- 1 bunch thyme, sage, and rosemary
- ½ cup olive oil
- 2 cups white wine
- 6 cups chicken broth
- 1 tsp black peppercorns
- ½ cup all purpose flour
- ½ cup unsalted butter or ½ cup of fat drippings
- 1 tsp poultry seasoning
- ½ tsp mushroom umami seasoning (optional)
- 1 tsp soy sauce
- Salt to taste
Directions:
For the Make Ahead Turkey Gravy:
- Preheat the oven to 400°F.
- Add celery, carrots, and leek to a large dutch oven or roasting tray. Trim the ends off the shallot, slice it in half lengthwise, and leave the skin on. Slice the top ⅓ off the garlic bulb and discard the top. Add the bottom garlic bulb to the Dutch oven with the shallots and herbs.
- Place the turkey wings over the vegetables and drizzle all over with olive oil. You’ll need enough to coat the turkey wings and vegetables.
- Season with salt and rub the olive oil into the turkey wings and vegetables. Make sure the herbs are tucked under the turkey wings so they don’t burn.
- Transfer to the oven and roast for 1 hour and a half, checking halfway through to make sure everything is roasting evenly.
- Remove from the oven, transfer the Dutch oven directly to the stovetop on medium heat, and pour in the white wine. If using a roasting tray that isn’t cooktop friendly, transfer the turkey, vegetables, and pan juices to a pot and add some white wine to the roasting pan to scrape up any browned bits to add to the pot. Cook for 3-5 minutes, using a wooden spoon to scrape up any browned bits at the bottom of the pan.
- Pour in the chicken broth and add the black peppercorns. Push the turkey wings down to ensure the broth properly covers them, adding a bit of water if needed.
- Bring to a boil, then reduce and simmer for 2 hours uncovered, stirring occasionally and skimming off any foam.
- Discard the turkey parts and any large vegetables, then strain the broth through a fine mesh sieve. Store in an airtight container in the fridge overnight to allow the fat to separate from the broth. If you are pressed for time, you can also freeze for 30 minutes to skim off the fat.
- The next morning, skim the fat from the broth and set aside. You should have about ½ cup of fat. You can use this to make the gravy, or use butter, depending on your flavor preferences.
- Add the fat or butter to a pot over medium low heat, and once melted, whisk in the flour until well combined. Continue cooking for 4-5 minutes, whisking constantly to cook out the raw flour taste. Meanwhile, heat your broth so it is warm when you add it to the flour.
- Slowly drizzle in the broth, whisking continuously to avoid any clumps. In total, you will use about 4 cups of broth, and can reserve the rest to loosen the gravy as needed when reheating, or to use as broth while roasting your turkey.
- Cook for about 3-5 minutes over medium heat or until thickened to your liking. Add the poultry seasoning, mushroom powder, and soy sauce. Season with salt, tasting to adjust for additional seasoning.
- Let cool and store in an airtight container until ready to use. When ready to serve, whisk into the drippings from the turkey, adding more flour or broth as needed to reach desired thickness (this will depend on how much you have in drippings). Keep warm on low until ready to serve.
Thanksgiving Roast Turkey
- Total Time: 4-5 Hours
- Yield: 14-18
Description
A delicious, fool proof turkey recipe with all tips and tricks to make Thanksgiving a breeze!
Ingredients
For the Thanksgiving Turkey:
- 1 15-20lb turkey
-
¼ cup salt (diamond crystal salt)
-
1 tbsp baking powder
- 2 sticks unsalted butter + 4 tbsps softened unsalted butter
-
1 lemon, quartered + Juice from 1 lemon
- 2 cups dry white wine
- 1 head garlic, top ⅓ sliced off + 4 garlic cloves, lightly smahed
-
1 small yellow onion, peeled and quartered
-
6 bunches of herbs (sage, thyme, rosemary)
Instructions
Directions:
For the Thanksgiving Turkey:
- 24-48 hours before you start cooking your turkey, remove any giblets from the cavity and reserve for stock or gravy. Pat dry thoroughly with paper towels.
- Combine the baking powder and salt and mix to combine. Season the turkey all over with the baking powder and salt mixture, including the inside of the cavity. If your turkey is less than 15lbs, you may not use all of it, if your turkey is more than 15lbs, add an extra 1 tbsp of salt for every 4 lbs of turkey.
- Place the turkey in the fridge on a wire rack and keep uncovered to dry brine until cooking, ideally 24 hours. If you are brining for over 24 hours, gently cover with cheesecloth or a clean kitchen towel to avoid excess moisture evaporation.
- Remove the turkey from the fridge 2 hours prior to cooking to come to room temperature. Place the turkey breast side up in a roasting tray and pat dry with paper towels. At this point you do not need to add more salt as the dry brine salted the turkey sufficiently. You can also remove ½ stick of unsalted butter from the fridge at this time to come to room temperature to rub the turkey with later.
- Once the turkey has been at room temperature for about 1.5 hours, preheat the oven to 450°F. Place the rack on the lowest level of the oven.
- To a small saucepan, add 2 sticks butter, lemon juice, white wine, half of the herbs, and 4 garlic cloves. Heat over medium heat until bubbly, then shut off the heat and let cool. Fold a 36”x36” large cheesecloth into quarters and place into the butter wine mixture to soak up the mixture as it cools.
- Fold wing tips under the turkey and stuff the cavity with lemon quarters, garlic, onion, and the rest of the herbs. Tie the legs together with kitchen twine. Rub the 4 tbsps of softened butter over the turkey. Add chicken or turkey broth to the base of the pan.
- Once the oven is preheated, lift the cheesecloth out of the butter mixture and drape over the turkey. Set the butter mixture aside on low heat as you will use this to baste the turkey.
- Place turkey in the oven with the legs facing the back of the oven (this is the hottest part of the oven. Bake at 450°F for 30 minutes, then reduce the temperature to 350°F. Baste the turkey with the rest of the butter mixture.
- Continue cooking the turkey for another 2 – 2½ hours, basting every 30 minutes. You want about an hour of roasting the turkey with the cheesecloth off to get the skin golden brown. This timing will depend on the size of your turkey (for a smaller turkey, start checking temperature sooner, right around 135-140°F is when you’ll want to pull the cheesecloth off for the rest of your cook). You want the cheesecloth to be pretty saturated with liquid on each baste, so if you see the base of the pan getting more dry, add more broth as needed.
- Once your turkey has reached 135-140°F, remove from the oven, and baste the turkey while carefully lifting off the cheesecloth. Be patient here and continue basting to keep the cheesecloth fully saturated in liquid as you peel it away from the turkey so you don’t rip the skin.
- Return the turkey to the oven so the breast is facing the back of the oven and roast for another 1 hour or until internal temperature reads 165°F, basting halfway through.
- Once temperature has reached 165°F, pull the turkey and transfer to a cutting board to let it rest for 45-60 minutes before carving.
- While the turkey rests, finish making your gravy. Add the roasting pan with the leftover juices to the stovetop over medium low heat. Whisk in the gravy you made ahead of time (recipe above) and heat until smooth and warmed through. Taste to adjust for seasoning. Whisk in more flour or broth as needed to get to your desired thickness – this will depend on how many drippings you have in the pan.
- Carve the turkey when ready to serve. Enjoy!
Notes
Buy early & thaw fully: Frozen turkeys can take 5–6 days in the fridge to defrost, so buy yours 5–7 days ahead to ensure it’s ready to brine.
Dry brine for crispy skin: Salt the turkey 24–48 hours before cooking and refrigerate uncovered. Use 1 tbsp kosher salt per 4 lbs of turkey, plus a little baking powder for golden skin.
Cook to temperature, not time: Use a digital thermometer and roast until the thickest part of the thigh reaches 165°F for a juicy, perfectly cooked turkey.
Butter-soaked cheesecloth: Keeps the turkey moist while it cooks and helps achieve an even golden brown skin.
- Prep Time: 1
- Cook Time: 3-4 hours
- Category: Dinner
- Method: Roasted